(this section does not print) Teacher’s Notes: Demonstrate the following before allowing the students to get started. 1, How to light the burner. 2, What the different types of flames mean (yellow, blue). 3, The parts of the flame (hottest, pre-combustion, etc). 4, How to pop popcorn kernels on wire gauze supported on a ring stand. About 3: suspend a match in the barrel of the burner using a paperclip or a piece of wire. Do this after letting the burner warm up (once it has been adjusted so it can be re-lighted easily).
Introduction to the Bunsen Burner
Overview
The bunsen burner is an extremely convenient source of heat for the chemical laboratory. It was designed by Robert Bunsen more than 100 years ago when he was a researcher at the University of Heidelberg in Germany. He needed a flame that was steady, clean and hot and these are all things that ordinary yellow flames are not. Ordinary flames are sooty and burn at low temperatures. Not to mention how much they flicker. Bunsen’s burner burns blue and very hot because it is designed to completely combust the gas without producing soot. It can do this because it mixes the gaseous fuel with air before it starts to burn.
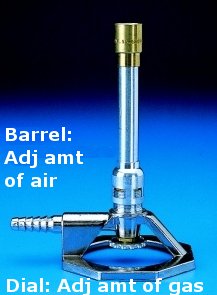
The burner you will use may have two valves. One of them controls the amount of fuel delivered to the barrel and the other controls the amount of air. If you have a different type of burner then there is only one control built into the barrel. The sliding perforated sleeve controls the amount of air that the fuel mixes with. In this lab you will learn how to operate either type of burner properly.
You will learn how to light and maintain a hot, blue, noisy flame. You will learn the difference between a luminescent flame and one in which soot and light is reduced to a minimum in order to maximize heat.
Materials
bunsen burner
rubber fuel tube
matches/lighter
safety glasses!
Here is the chemical reaction of the bunsen burner fuel with oxygen as it burns: CH4 +
2O2 —> CO2 +
2H2O CH4 is called methane and is the major component of natural gas. This equation may remind you of the chemical reaction of the burning of a candle. Notice that carbon dioxide and water are the chemicals that result from the reaction.
Safety
If you choose not to wear safety glasses you are choosing to sit out the lab
If anything goes wrong immediately close the lab bench fuel valve
If you cannot get the burner to light within about 15 sec then immediately close the lab bench fuel valve and wait for assistance
Never ever leave the burner unattended!
Keep flammable substances far away from the burner
Be careful not to touch objects recently heated by the burner: hot glass looks just like cold glass!
Flames and hot objects can cause fires and burns: use caution at all times
page break
Procedure
How to Light the Burner
Connect the fuel tube to the bench fuel valve and to the burner
Completely close the fuel valve (the dial on the bottom) and the air inlet (the barrel)
Light a match or lighter and hold it over the burner’s barrel before turning on the gas
Turn on the lab bench fuel valve as shown in the picture at right; a valve is open if the handle is in line with the outlet—it is closed if it is at right angles to the outlet
Open the built-in fuel valve with 1/2 to a full turn
You should see a bright yellow flame—the light and color are provided by tiny particles of unburned carbon from the fuel which have been heated to incandescence
Turn the air inlet (the barrel) to adjust the flame so that it is a small neat blue cone; you will hear a rushing sound if you have it right
Do not allow too much air to flow into the barrel since this will just blow out the flame; if this happens, turn off the gas and begin again by closing everything down to the way it was when you started
Once you have had your flame approved by your teacher draw the lit burner in your lab notebook; label the parts of the burner and indicate which parts of the flame are hottest
Put the burner out by shutting off the fuel at the lab bench fuel valve; see the picture (the valve on the right is closed); this is the standard procedure for putting out the flame
Make sure that everyone in your group has an opportunity to successfully light the burner; all students should be experienced with this procedure
When all students have practiced lighting the burner, be sure to put it out by turning off the gas
Describe the flame of a properly burning bunsen burner.
What does it mean if you have a flame that is tall and bright yellow? How do you correct the problem?
You are trying to light your burner but when you turn on the gas at the lab bench valve the flame of your match immediately goes out. After immediately shutting off the gas what steps must you take to get the burner to light?
Why didn’t the match head suspended over the bunsen burner’s barrel ignite when your teacher lit the burner? What happened when the match was pushed toward the edge of the barrel and why? Explain your answer using evidence and reasoning.