|
| Figure 1 |
Soap Making
Introduction
Soap is an essential part of our everyday lives. Keeping our clothes, our dishes, and our bodies clean is important for our health and comfort. There are many kinds of soaps but they all share certain features in common. Soap molecules consist of long chains of carbon atoms which have at one end an organic acid group. This acid group is missing the hydrogen atom which would make it acidic and instead is accompanied by a sodium or potassium ion. The chemical structure of a single soap molecule, with its accompanying sodium ion, is depicted in fig. 1, at right. This is one of many possible molecules, which have varying carbon-chain structures. This one is know as sodium oleate (NaC18H33O2).
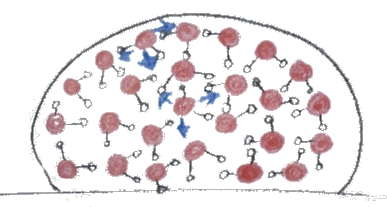
A soap molecule functions in two important ways. First of all, it serves as a surfactant. Surfactants are substances which reduce the intermolecular forces of attraction of water when they are dissolved in the water. These intermolecular forces (IMF) bind molecules to one another in the liquid and solid states. They govern how well a substance will dissolve in a solvent such as water, too. The strength of the IMF that binds water molecules to one another is relatively high. And although soap molecules dissolve in water readily enough, water molecules do not bind as tightly to the soap molecules as they do to one another. As a result, the overall strength of forces between molecules in a soap solution is less than in pure water.
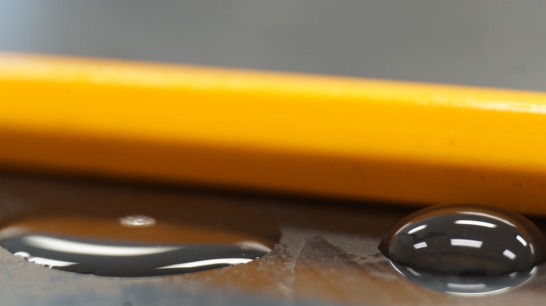
This can be understood in terms of surface tension: a droplet beads up due to the attractive forces between water molecules (see fig. 2).
|
| Figure 2 |
|
| Figure 3 |
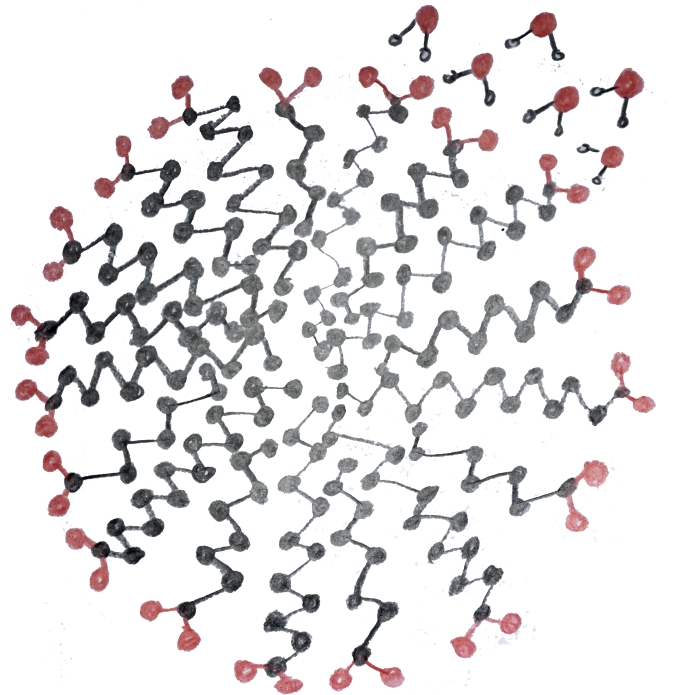
The second way that soap molecules work to help make things clean is that they can mix both with water and with oils and fats. Some compounds we wish to wash away from dirty hands or clothing are only fat soluble and do not dissolve in water. Natural fats and oils are collectively known as lipids. Lipids are non-polar molecules and cannot bind to water by dipole forces. Still, given that they are very large molecules, there are strong dispersion forces holding molecules of lipids together. These forces keep them from separating from each other, which they would have to do to mix with water. Since they do not separate and since they do not bind well to water molecules, which are small and polar, they do not dissolve in water. On the other hand, soaps can dissolve in lipids, and vice versa. The long carbon chain is what makes a soap molecule capable of forming solutions with lipids since both kinds of molecule have this structure in common. Soaps are, after all, made from lipids to begin with. The true power of soap molecules comes from the fact that they can also dissolve in water. This is due to the fact that soap molecules have an ionic charge at one end. Water is a great solvent for ions as water molecules bind more tightly to ions than they do to one another.
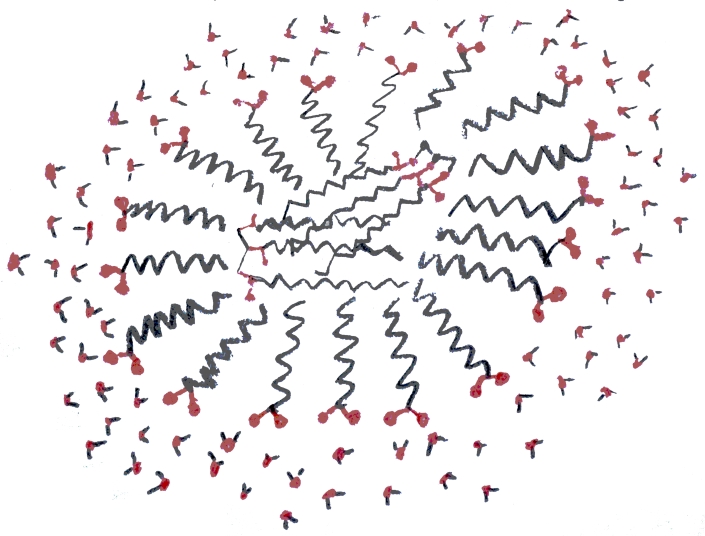
The reason this dual solubility helps soap to clean things is that soap molecules form micelles. These are structures in which many soap molecules cling together with their carbon-chain tails inside and their ionic heads outside. In fig. 4 a micelle is shown in cross-section: these are actually spherical structures. A few water molecules have been included to represent the surrounding liquid. In addition to micelles, soap molecules can form films which are much like the lipid bilayer that makes up the membrane of a living cell. When soapy water comes into contact with greasy material the molecules of the greasy material become trapped inside of micelles and films. In the case of a film the molecules line up next to one another to make extended structures with their tails together and their heads toward the water. This is why soap can make long-lasting bubbles. In fig. 5 a micelle is illustrated which has two triglyceride molecules in its center. This illustrates how soap dissolves lipids. When rinsed with water the micelle and its cargo of lipids is washed away.
|
| Figure 4 |
|
| Figure 5 |
Soaps are made from naturally occuring fats and oils. These include palm oil, soybean oil, coconut oil, olive oil, beeswax, lard, and dairy fat among many others. Naturally occuring fats have widely varying structures but usually consist of three copies of a long carbon chain (known as an acyl group or fatty acid), each of which is bound by an ester bond to a molecule of glycerin (C3H5(OH)3, see fig. 6). Lipid molecules with this structure are known as triglycerides or triacylglycerides and they perform a wide variety of functions in a living organism. An illustration of a triglyceride with three oleate acyl groups can be seen in fig. 7 (C3H5(C18H33O2)3). Biologically, lipids play many roles. In our own bodies, layers of cells containing large droplets of fat molecules can serve as both insulation and a back-up source of energy. In addition, fat molecules aid in the storage of biologically important molecules which are not soluble in water, such as vitamin D.
This lab activity is concerned with the organic synthesis of soap. This reaction has been carried out by people for millenia. At first, it may have been done by accident when alkaline ashes from a fire were mixed with fat. When natural oils are mixed with a strong alkali such as sodium or postassium hydroxide (NaOH or KOH) a reaction called saponification occurs. For example, the saponification of a triglyceride molecule with three oleate carbon chains (C3H5(C18H33O2)3) proceeds as follows, First, a hydroxide ion (OH–) binds to a carbon atom on the fatty acid. The carbon atom it binds to is the one which sits between the two oxygen atoms. This carbon atom now has three oxygen atoms bound to it in addition to its bond to the neighboring carbon atom. Next, the bond between that carbon atom and the oxygen atom attached to the glycerine backbone is broken. The other two oxygen atoms remain tightly bound. The oxygen atom left behind on the glycerin backbone has a negative charge because it takes the electrons that were in the bond with it when its bond to the fatty acid is broken. As a result it steals the hydrogen atom that was originally part of the hydroxide ion away from the now separated fatty acid, turning the fatty acid into its basic form. This happens for all three carbon atoms on the glycerin backbone, leaving plain glycerin (C3H5(OH)3) and 3 units of sodium oleate (NaC18H33O2). Unless steps are taken to purify the soap by removing the glycerin, the glycerin will remain in the soap. In this lab, and in some commercial soaps, this is done deliberately because glycerin is useful as a skin conditioner.
|
| Figure 6 |
Knowledge of the details of soap synthesis has led to the technological development of detergents. Soaps are made from naturally occuring lipids and have just one kind of ionic head. Detergents are substances with similar structure and function to soaps but they may be cationic (positively charged), anionic (negatively charged), or non-ionic. Detergents overcome some of the drawbacks of traditional soaps. Traditional soaps only work best when the temperature is warm or hot. Also, soaps will react with calcium (Ca2+) or magnesium (Mg2+) ions to form an insoluble solid. On bathroom tile this is called soap scum and when it affects clothing it makes the fabric appear dull and gray. Detergents are engineered to avoid these pitfalls of soaps so that they function at low temperature and do not form insoluble solids with the magnesium or calcium ions found naturally in water.
In this lab you will be making a few small bars of soap by doing a saponification reaction with palm oil, coconut oil, olive oil, and sodium hydroxide. The oils are gently warmed to melt the coconut and palm oils, which are high in saturated fatty acids. The alkali you use will be sodium hydroxide, which you will need to dissolve in water. Mixing sodium hydroxide into water releases a lot of heat, so that solution will initially be very hot. The two mixtures will be allowed to cool to about 45°C and then mixed with constant stirring.

|
| Figure 7 |
The chemistry here is fairly easy to follow conceptually but a bit harder to work with quantitatively in terms of stoichiometry. This is because of the variable structures of oils. Since natural oils are mixtures, there is no single molar mass that allows the calculation of the number of moles of sodium hydroxide needed to fully saponify them. All natural oils contain a mixture of different triglycerides, each with its own molar mass. Because of this it is not a simple matter to calculate the moles of triglyceride molecules and to work out from that the correct amount of sodium hydroxide. By experimentation and analysis of the structure of the oils a saponification number can be assigned. This number is used to find the right amount of alkali to saponify that oil. Online calculators make determining the amount of sodium hydroxide quick and easy, even for mixtures of different oils. The amount of sodium hydroxide has been calculated carefully (using soapcalc.net) and precise measurements are critical. The amounts specified in the procedure will saponify most of the oil molecules but will also result in a small amount of unreacted lipids. This is by design. The amount of unreacted oils is called the ‘super fat’ or ‘lye discount’. It is common to have a lye discount (a reduction of the amount of sodium hydroxide used below the stoichiometric amount) of 5% to 8%. By ensuring that the oil is the excess reactant you can be sure that the sodium hydroxide will have been completely used up, leaving none behind in the final soap. Sodium hydroxide is a strong alkali and is much too harsh for use directly on skin. The excess oil also aids in conditioning skin when the soap is used becuase the oils coat the skin and help prevent the loss of water from skin cells. In addition to the cautious excess of fat you will ensure good quality soap by using a curing period of 2 - 3 weeks. This allows moisture to evaporate and gives more time to allow the saponification reaction to go to completion, eliminating any residual sodium hydroxide and finally making the soap ready to use. Saponification is usually complete quite soon after mixing if the mixing is thorough but if there happen to be pockets of material with excess sodium hydroxide the waiting period will help to ensure that it has a chance to react. Without this waiting period it is possible that the soap will dissolve too quickly in water when used and so be used up faster. If this should happen anyway, remove the soap from service and allow it to dry for a few days before using it again.
The saponification reaction is an exothermic reaction and the heat released in the process helps to speed the reaction. The equilibrium constant for the reaction is very large and though it is exothermic its value is not reduced by very much with increasing temperature. The reason the reaction is carried out with warmed oils is mainly in order to control the rate of the reaction which is several times faster at 45°C than at room temperature (around 20°C). At 45°C the reaction is fast enough to be nearly complete after a few minutes but slow enough that there is time to add color and scent ingredients. This is why the soap making is not usually done at much higher temperatures: it would be so fast that it would be difficult to add color and scent.
Pre-lab Questions
Answer these questions before coming in to the lab. If you do not know how to make the drawing or answer the question then that is a hint that you should go find out. Study the figures in the text for help and inspiration. Most of what you need to know to answer these questions can be found in the introductory text in this lab handout. If you do outside research, cite your sources, make sure they are legitimate, and do not copy and paste. Read and understand and write in your own words, always.
- Draw a cartoon picture of a thin film of soap molecules showing how the carbon-chain tails stick together while the ionic heads dissolve in water. (see fig. 5)
- Using your understanding of intermolecular forces explain how mixing soap molecules with water reduces the strength of intermolecular forces in the mixture as compared to those within water alone.
- Draw the structure of a triglyceride molecule based on the fatty acid in figure 1 in the introduction.
- Write a balanced chemical equation for the saponification reaction for a triglyceride molecule with three oleate carbon chains, which has the chemical formula: C3H5(C18H33O2)3.
- Read the safety information below: What are the dangers of using sodium hydroxide? What physiological effects does it have on skin? On eyes?
- Based on the introduction, how does the design of this lab activity work toward reducing the risk of having excess sodium hydroxide in your soap?
- Are soap molecules acids or bases? Explain.
- Based on your knowledge of chemistry what class of chemicals will be best suited to the removal of soap scum? Acids? Bases? Oxidizers? Reducers? These are all chemicals part of common cleaning materials. Explain your answer.
- Find the chemical structure of a detergent online. Give its chemical name and draw a Lewis structure for it. Describe how it avoids one of the pitfalls of soaps made from natural lipids (see the introduction).
- Some simple scents and colorants will be made available to you for this lab. If you would like to contribute your own, some ideas include: cocoa powder for color and vanilla for scent, cinnamon for color and scent, and turmeric or paprika for color with an essential oil (such as sweet orange) for scent. Do some research online at soap-making hobby websites and find out a few other ideas and write them down in answer to this question. And bring something in if you would like to use it!
Materials
- 33.33 g palm oil
- 33.33 g coconut oil
- 33.33 g light olive oil
- 14.58 g NaOH
- 28.0 mL water
- 1 g titanium dioxide (optional)
- 1 - 2 g other colorant (optional)
- 24 - 32 drops essential oil (optional)
- Lab Balance
- 2 250-mL beakers
- 1 100-mL beaker
- 50-mL graduated cylinder
- thermometer
- electric hot plate
- magnetic stirrer with stir bar (optional)
- metal scoop
- plastic cup as soap mold
- oven mitt
- lab goggles
- nitrile gloves
Safety
- If you choose not to wear safety glasses you are choosing to sit out the lab.
- Wear gloves when handling solid sodium hydroxide or sodium hydroxide solution. This substance is highly corrosive. Be careful not to touch other objects or surfaces with contaminated gloves. When taking gloves off, do so without allow skin contact with the outside surface of the glove
- The dust from solid sodium hydroxide is an eye and respiratory tract irritant. It is also toxic by ingestion. Avoid contact and wash hands after handling it. If exposed to dust, remove victim to fresh air. If in eyes, rinse with cold water for up to 15 minutes.
- Sodium hydroxide is a strong base and can cause severe damage to skin and eyes. Eye exposure can lead to blindness if not addressed immediately. Avoid contact and wash hands after handling it. Adhere to proper glove procedures. If in eyes, rinse with cold water as soon as possible for up to 15 minutes.
- When mixing sodium hydroxide with water a large amount of heat will be released. This can cause the water to boil and the liquid to spatter. Sodium hydroxide can cause blindness if it enters the eyes. Adhere to instructions carefully to mitigate this hazard.
- Hot plates can be very hot without looking different from a hot plate that has not been turned on. Use caution around heated appliances and be aware of those around you.
- Always close containers of chemical supplies when they are not in use.
- Wash hands thoroughly with soap and water before leaving the laboratory.
Procedure
Be aware of the chemical hazards as you follow this procedure. If done carefully there is little chance of harm. If carried out carelessly permanent injury could result. Have fun!
- Measure 33.33 g of olive oil into a 250-mL beaker. Add 33.33 g of palm oil and 33.33 g of coconut oil. These oils are solid at room temperature due to their composition, which has a larger percentage of saturated fats. Given that it is challenging to remove just one oil as you measure them all into the same beaker, it makes sense to start with the liquid and then add the solids. You should be able to scoop any excess solid oils back out if needed.
- Mix all three oils together once they have all been measured out.
- Warm the oil mixture on a hot plate at a low setting to about 45°C. Do not exceed a temperature of 50°C. If you do then you must allow it to cool off below this temperature before proceeding. This will melt the coconut and palm oils and allow the oils to form a homogeneous mixture. It will also be warm enough for a rapid saponification reaction.
- Use an electronic balance to measure out precisely 14.58 g of sodium hydroxide in a 100-mL beaker or a plastic weighing boat. Take care in handling the solid as contact with skin can cause injury and the dust is an eye and respiratory tract irritant. Do not exceed 15.3 g of sodium hydroxide as that would be the full stoichiometric amount.
- Measure 28.0 grams of water either by volume (28.0 mL) or by mass and pour it into a 250-mL beaker.
-
Note that adding all of the NaOH at once will cause the solid to fuse into a large mass that will be almost impossible to dissolve. In addition, it risks a runaway release of heat which can cause injury.
Use a glass stirring rod to constantly stir the water while adding small portions of your measured amount of sodium hydroxide to the water. If you are using a magnetic stirrer then make sure it is not spinning too fast. Do not let any water splash up on the sides. Do not add all of the sodium hydroxide to the water at once! Add about a quarter of the total at a time and wait for it to dissolve before adding more. The water will get hot but will not get out of hand as long as you only add a little at a time. Keep stirring and adding more solid until all of the NaOH has dissolved. You may use a wash bottle to rinse any solid NaOH out of the container you measured it in. A tiny amount of additional water will not affect the recipe.
- The NaOH solution will be ready to use when it has become completely or nearly completely clear and when there is no more evidence of solid pieces of material. At this point, add the warmed oil to the sodium hydroxide solution as it stirs slowly on the magnetic stirrer. You may turn the stirrer up to maximum speed. You will need to stir occasionally with a metal scoop or spoon because the mixture will grow too thick for the stirrer to handle. Do not use a glass stirring rod as the shear forces will probably break it.
- Watch the mixture carefully while continuing to stir rapidly. The magnetic stirrer set to its maximum speed can sometimes fail to operate properly. Sometimes the magnet stir-bar just bounces around. If it does, just turn the motor off and wait until motion stops. Then start it up again. The soap needs to be mixed for 15 - 20 minutes.
- During the mixing process you may see a clear layer form on top. It’s possible that this layer includes some of the glycerin by-product of the saponification reaction. Be sure to mix thoroughly to incorporate this material. Glycerin in the soap will help it to be gentle and non-drying on skin.
- The reaction mixture will gradually thicken as the reaction proceeds. When it is thick enough that a small portion of the mixture dribbled on top leaves a trace on the surface you have reached the point where you may add colors and scents. You may add up to 36 drops of essential oil (you may mix scents) or small amounts of scented materials you may have brought from home. Stir thoroughly to mix.
- If you wish to add titanium dioxide white pigment or any other solid pigment to your soap to cover the yellow color of the oil, do it now. Pour a little of your soap mixture into a separate container. Use a very small amount of the titanium dioxide powder, about 1 cm long and just covering the end of a metal scoop. Make a slurry of the titanium dioxide (and/or other pigment) with the small portion of your soap mixture by stirring until homogeneous. Add this back to the main body of the soap mixture and stir thoroughly until well dispersed. Pour back and forth to get all of the colored mixture blended in. You may mix multiple colors, if you wish so that a swirled appearance may be made in your bars of soap.
- Once you have finished mixing it is time to put the soap in a mold. Appropriate molds include old yogurt or pudding containers or plastic weighing boats from the lab. Special, purpose made silicone molds may be available for you to use. Make sure to pour the soap into a mold before it solidifies.
- In a day or two your soap may be hard enough to take out of the mold. If the shape allows it, this is a good time to slice the soap into convenient bars. Once cut, set the soap out to cure. Or bring it home with you to cure in a cool, dry place with plenty of ventilation. After 2 - 3 weeks the soap will be dry and ready to use. If used too soon then the water mixed in with the soap will make it dissolve quickly. Also, it is possible that the saponification reaction is not fully complete and some unreacted sodium hydroxide will still remain in the soap until curing is complete.
- Wrap bars of soap in paper labelled with its contents.
Post-lab
Answer the following questions in a typed document.
- Evaluate the procedure. Were there any circumstances that you wish you had been told about before-hand? Was there anything that did not work as described? How would you improve this lab?
- Describe the process of soap making from a chemist’s point of view. What chemical reactions occur?
- Describe the soap making process based on your own observations. Decide what the key steps and turning points are. Describe them and relate them to your understanding of the chemical transformations that are taking place.
- What two consequences are there to using the soap too soon after it is made? In other words, why is there a curing period for the soap?
- Glycerin is a by-product of soap production. Was it possible to recover the glycerin from this procedure? Where is the glycerin? Explain.
- Glycerin is a valuable chemical for synthesis of useful materials. Find two materials that use glycerin as a starting point in their manufacture. Describe each product, its uses, and how it is made.
- Advanced Chemistry Students only: Thermodynamically, the saponification reaction is exothermic. That is, it releases heat. However, since the equilibrium constant is so large, the reduction in its value with increasing temperature (according to the Le Châtelier Principle) is not important. Consider how rates of reaction are affected by an increase in temperature and explain why the reaction in this lab is carried out at 45°C rather than at room temperature.