In this lab students will learn about atomic energy levels, emission spectroscopy, and flame tests for element identification.
Students will observe small samples of chloride salts of different metals. These will be placed into a flame in order to observe the colors produced. These colors come from the excitation of electrons which then resume their ground states by emitting light of very specific colors.
The electrons in an atom occupy different energy levels. When all of the electrons are at the lowest possible energy level they are said to be in the ground state. In this state electrons are as close to the atom’s nucleus as they are allowed to be. When they are there, they have their lowest possible potential energy. Just as a ball sitting on the ground has its lowest potential energy, electrons which are close to the nucleus are similarly low in potential energy.
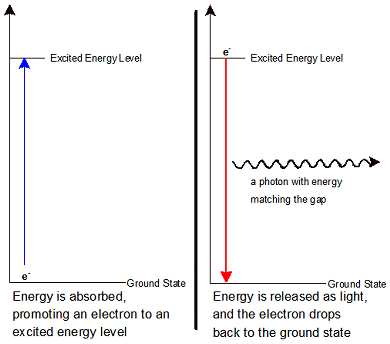
Electrons do not always stay in the ground state. Sometimes they can be promoted to an electron shell with a higher potential energy. This can happen in two ways. First, the electron can absorb a photon of just the right amount of energy to move it from one quantum shell to another. Second, when atoms are heated in a flame or energized with electricity their electrons can gain energy. This promotes them to the higher-energy shell. When an electron is in a higher-energy shell it is said to be in an excited state. Excited states are situation where one or more electrons within an atom are at a higher potential energy than they would be in the ground state. There are many possible excited states for atoms.
Electrons in excited states do not stay in them for very long. When electrons lose their energy they do so by emitting light. In this way, excess potential energy is transformed into the energy of light. Each time a single electron drops from higher to lower potential energy, a particle called a photon is produced. Photons are particles with energy but no mass. Their energy is inversely proportional to the wavelength of the light (this can be expressed in the proportion, E = hc/λ, where λ means the wavelength). The photons emitted precisely match the quantum energy difference between the excited state and the ground state.
A salt is a type of compound that include a metal ion and a non-metal ion. Sodium chloride (NaCl) is the most familiar example of a salt but others include calcium chloride(CaCl2) and copper(II) chloride (CuCl2). These compounds look very much the same to the unaided eye. For example both sodium chloride and calcium chloride are colorless crystals and as a fine powder they are white. In order to identify which salt you have, you have to do a test on the material. A traditional method for identifying elements in compounds is called a flame test.
In flame tests salts that are dissolved in water are evaporated using a hot flame. In the flame the atoms become excited and produce a characteristic color. This happens when the atoms’ excited electrons fall back down to the ground state. The color we see depends on the difference in energy between the excited and ground state. For some atoms this is a large difference and for others it is a smaller difference. The color can be used to tell if the energy difference is large or small. The purple end of the spectrum has the smallest wavelength and so the energy of that light is the largest. The red end of the spectrum has the largest wavelength and so that color represents the smallest energy changes. Remember the order of colors in a rainbow is ROY G BIV (red orange yellow green blue indigo violet). Energy changes can be judged against the spectrum because as you go from red to violet the energy change that made the color gets larger. Different atoms have different possible excited states, which vary in their distance from the atom’s ground state. Each element has a unique set of possible excited states. Because of this it is possible to identify an element by doing a flame test and recording the observed color. Every element has a unique flame test color.
It is a traditional art of the chemistry laboratory to use these colors to identify specimens of compounds that contain unknown metals. This is no longer a common laboratory technique though highly advanced technologies use the same production of light to identify elements and to measure how much is present. The production of light in a flame is still used outside the lab, though. It is put to use by practitioners of the art of fireworks manufacture. By including different metal salts, or mixtures of metal salts, in the exploding shell of a firework, these artists can produce beautiful displays in nearly all the colors of the rainbow.
| Color |
Representative
Wavelength (nm) |
Wavelength
Region (nm) |
| Violet | 420 | 400 - 440 |
| Blue | 455 | 440 - 470 |
| Blue-green | 480 | 470 - 490 |
| Green | 525 | 490 - 560 |
| Yellow-green | 565 | 560 - 570 |
| Yellow | 580 | 570 - 585 |
| Orange | 620 | 585 - 630 |
| Red | 660 | 630 - 700 |
Light is a kind of wave, an electromagnetic wave. Our ability to perceive color depends on the different wavelengths of light. If you observe a rainbow or use a prism to split white light then you are looking at how our eyes and brain work together to give us the sensation of the colors of the rainbow. Because we see different ranges of the visible spectrum as different colors it’s possible to roughly assign a color we see to a particular wavelength of light. It is not a perfect match, but it’s a good start and is good enough for now. Take a look at the chart at right. It details the colors people in our culture usually assign to the rainbow and gives each color a range of wavelengths in units of nanometers. A nanometer (nm) is a billionth of a meter (1 m = 1 × 10⁹ nm). Each color can be assigned a ‘representative wavelength’. You will use these to identify colors in this activity.
Remember to record your observations in your lab notebook or on a piece of paper in your binder before you leave class. When making observations be sure to use all of your senses except taste. Never taste anything in the chemistry lab. Chances are good you will regret it if you do.
| Ionic Compound Formula | Cation (positive ion) | Anion (negative ion) | Color Observed | Representative Wavelength (nm) | Element Responsible for Color |
For this lab you must turn in the following items: